
Solar on slate roofs
SlatePlate™
Yes — solar can go on a slate roof. SlatePlate is the patented mounting system that makes it work: no slate courses removed — not even a single slate tile — and the array’s weight designed to land on the roof structure rather than the tiles. Solar Slate Solutions makes SlatePlate and installs the slate mounting, working alongside your solar installer, who handles the panels, electrical, and permitting.
Two U.S. patents & one E.U. patent · U.S.-made · 110 MPH wind-driven-rain TAS 100(A) test passed — without sealant
U.S. & E.U.
patented mounting system





How it protects the slate
The slate isn’t clamped or loaded, by design.
Built for slate, not shingles
Standard solar hardware is made for asphalt shingles — it clamps or drives fasteners in ways that put lots of pressure on the roofing surface. On slate, that is exactly how tiles crack. SlatePlate is designed around a different idea: carry the weight past the tile.
A load path to the structure
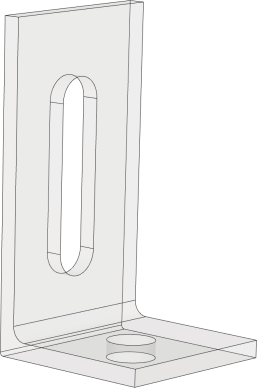
The L-Mount, SlatePlate, Base w/Notch, Spacer and Adjuster are designed to form a load path straight down into the structural member (rafter) below. We drill through the sheathing, so the standoff bears on the roof’s structure rather than on the slate. The notch-and-spacer geometry means the natural slate seats against the SlatePlate rather than bearing the panel’s weight.
Protected, not sacrificed
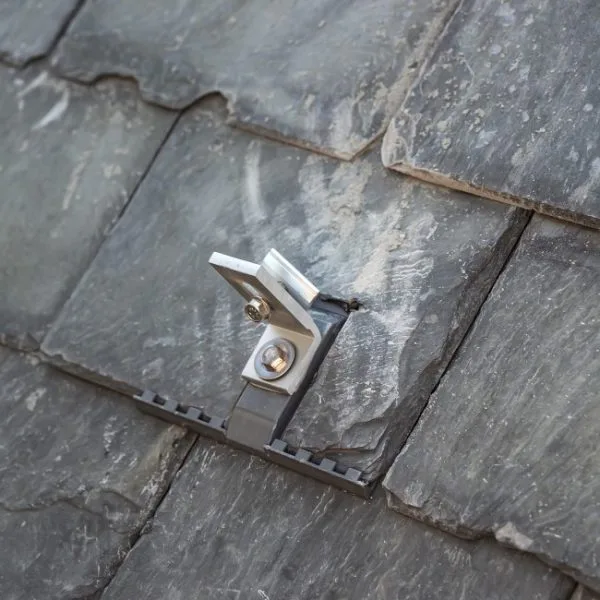
The result, by design, is solar mounted with the slate protected — not sacrificed to hold the array up. The natural slate seats tight against the SlatePlate and laps back over it, so the roof keeps its look and keeps shedding water.
The load path, in order — it ends at the structure:
- Panel & rail — standard racking lands on the L-Mount, as it would on any roof.
- L-Mount — bolts down onto the SlatePlate assembly.
- SlatePlate & Base w/Notch — the sheet carries the Base moulded to it, and the Base interlocks with the Spacer below.
- Spacer & Adjuster — the standoff carries the weight down through the sheathing. With the Adjuster fitted it reaches the structural member; where the slate is thin enough not to need one, the Spacer reaches it alone. The stainless lag secures the assembly.
- Structural member — the rafter. The lag anchors into it, and this is where the array’s weight lands: on the roof’s structure, not on the slate.
Natural slate — not in that path. It seats tight against the SlatePlate and laps back over it: protected, not clamped, carrying none of the array’s weight.
Who does what
Who does the work — and in what order.
Solar Slate Solutions does not sell solar systems or do full installations. We make a slate roof ready to carry your solar system — and either mount the SlatePlates ourselves or train your installer to. Everything else is your solar installer’s job, exactly as it is on an asphalt roof today.
-
1
Either door works
First contact
Reach us first and we bring in a local solar installer. Reach an installer first and they bring us in for the slate. Either way, the installer quotes the system, signs the contracts, and runs the whole project — the same way installers run asphalt jobs today.
-
2
Your solar installer
Whole-job evaluation
Sun, shade, production, electrical service, system size, and what the array will cost and return — the installer evaluates the entire job.
-
3
Solar Slate Solutions
Slate roof assessment
We assess your specific slate roof — slate condition, roof structure, rafter locations — and confirm it is a candidate for SlatePlate.
-
4
Your solar installer
Permits and utility
The installer pulls the permits and handles the utility interconnection, to local and state code — the same path any compliant solar install goes through.
-
5
Solar Slate Solutions
Install the SlatePlates
Our crew or our licensed, trained subcontractors mount them — the six-step method, below. Or we train your installer’s crew to do it. Either way, the people on the slate are set up for slate.
-
6
Your solar installer
Racking, modules, electrical
The installer sets the racking on the SlatePlate mounts, the modules on the racking, and runs the electrical.
-
7
Your solar installer
Inspect, energize, maintain
The installer obtains the required inspections, energizes the system, and maintains it. The roof sheds water the way it always has.
Built to code
Mount locations and the array follow the project engineering and local & state ICC codes — the same permitting and inspection path any compliant solar install goes through.
Roof stays weather-tight
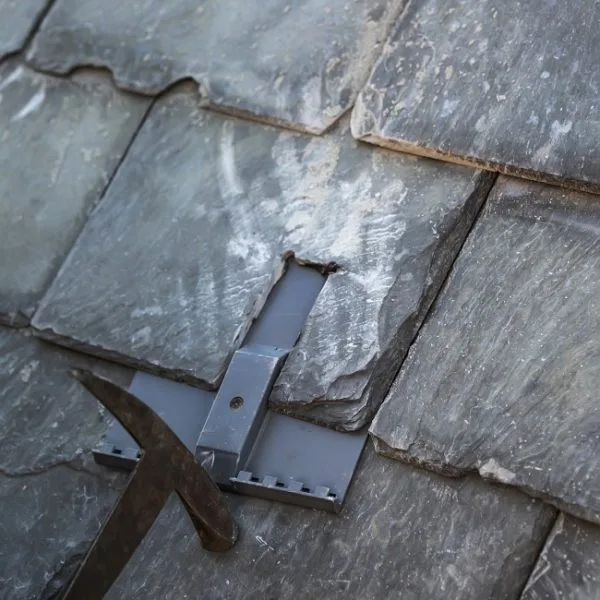
The SlatePlate sheet is itself the flashing. Sealant goes in twice — under the flashing in the bored cavity, and again above it in the hole the lag passes through — the lag carries a butyl/stainless washer, and the slate above laps back over the SlatePlate, so the detail is designed to keep the roof shedding water the way it always has when the crew leaves.
Curious how fast each mount goes in? About 4 minutes for a trained, experienced installer — the founder has installed 4 mounts, on a ladder, in under 13 minutes.
The method
Six steps, one attachment point.
Every solar mount is one attachment point. This is what happens at each one, in order, following the SlatePlate installation guide. This is the mounting method; your solar installer sets the PV panels, wiring, and electrical. Full dimensions and part numbers are on the Technical Documents page.
1
Center the template over the rafter
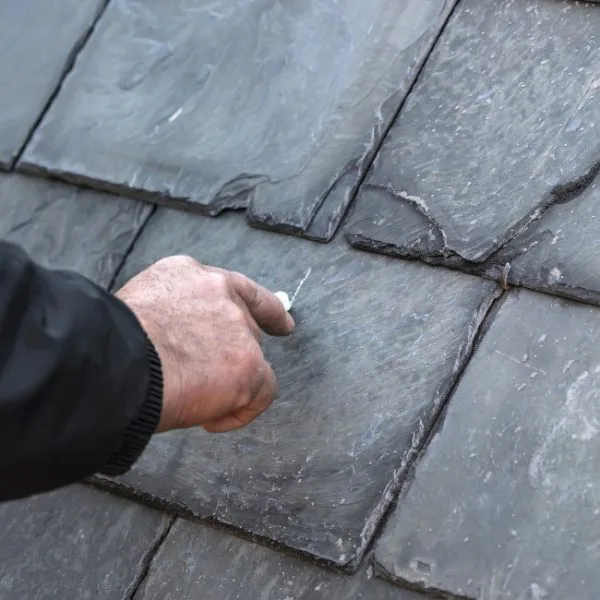
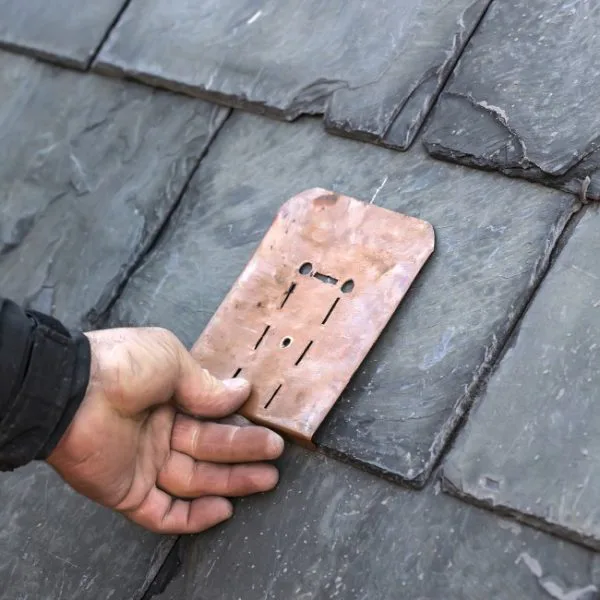
The installer locates the roof’s structural members, centers the supplied template over the rafter, and marks the drill points and the notch outline. A center pilot is drilled into the structural member. Mount locations follow the array’s engineering plan and local & state ICC codes.
2
Drill the relief holes and grind the notch
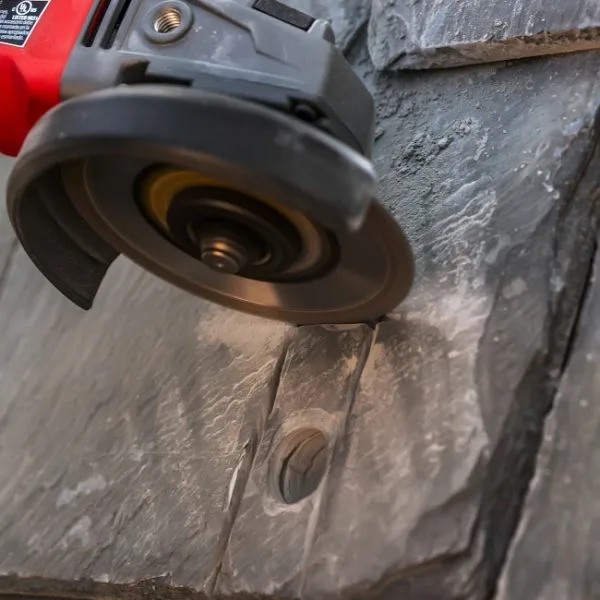
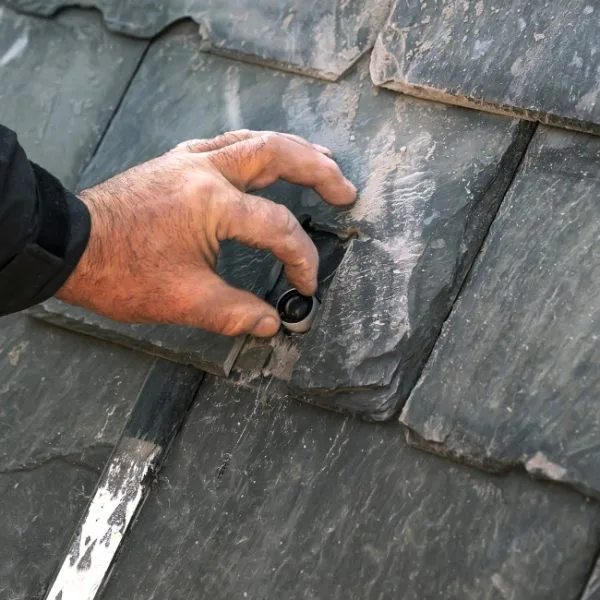
A flat bar slides under the slate to protect the course below. Two relief holes are drilled at the notch’s top corners, and a diamond wheel grinds the notch between them — stopping at the relief points so the slate scores cleanly rather than fracturing.
3
Open the path to the deck
A 1″ (25 mm) masonry hole saw, pilot-guided, bores through the slate down to the roof sheathing, exposing the wood deck at the mount point.
4
Seal the cavity and set the Spacer
The cavity is filled with sealant just below flush, and the Spacer is inserted. This is the first of two sealant applications — under the flashing.
5
Slide the SlatePlate flashing home
The SlatePlate sheet — the flashing — is test-fit, cut to length, and slid up into position, locking the Spacer. The slate above laps back over it and stays part of the roof.
6
Seal the lag hole and secure the L-mount
Sealant is charged into the hole the lag bolt passes through — the second application, above the flashing — and the installer’s preferred single-hole L-mount is secured with the stainless structural lag and its butyl washer.
See it on the roof
Watch a full SlatePlate install.
The step-by-step method is one thing to read and another to watch. This is field footage of a complete attachment point going in, start to finish.
Proof
Tested, patented, and made here.
Passed the 110 MPH wind-driven-rain TAS 100(A) test — without sealant
SlatePlate passed the 110 MPH wind-driven-rain TAS 100(A) test without sealant — and every installation uses sealant. Tested by Intertek — a third-party test of the weather-facing interface. This validates water-tightness (weather resistance), not structural or wind-uplift load capacity.
3
granted patents — two U.S., one European
2017
founded — purpose-built for solar on slate
100+
U.S. installations
USA
designed and made in the United States
Patents: U.S. 10,541,641 B2 · U.S. 10,601,361 B2 · E.U. EP 3,704,791 B1 (granted 2023). Other patents pending.
UK MCS and further European certifications are in progress.
Talk to a slate-solar specialist.
Patented slate-roof mounting — and a straight answer about your roof.
Send photos of your slate roof for a feasibility review, or ask how the method applies to your project. A real person answers.
Solar Slate Solutions, LLC · Mon–Fri 9–5 · Sat 9–1 · Sun closed
Anatomy of a SlatePlate mount
Six components. One purpose.
Each SlatePlate unit ships as a complete attachment point. The L-mount that carries your racking is chosen by the installer and is not included.
- 1 · SlatePlate — the large sheet that slips between the slate courses. This sheet is the flashing. Part# SPLAT02.
- 2 · Base w/Notch — interlocks with the patented Spacer. Part# BASWN02.
- 3 · Spacer — screws together with the Adjuster to set the standoff — 0.75 in with the Spacer alone, up to 2-1/2 in with the Adjuster fitted. Part# SPACR01/02.
- 4 · Adjuster — sits beneath the Spacer and dials in the exact height; it carries the array’s weight down to the structural member, and on thinner slate that needs no Adjuster the Spacer does it alone. Part# ADJST01.
- 5 · Stainless-steel lag — 5-1/2 in, 5/16 in dia., anchors the assembly into the structural rafter. Part# LAG5501.
- 6 · Sealing washer — butyl and stainless steel, 3/4 in OD; supplied with the lag and seals the fastener penetration. Part# WASHR01.
- L-Mount (not included) — installer-supplied. SlatePlate works with most single-hole L-mounts.
Compatibility
Fits the way you already work.
L-mounts
- Works with most single-hole L-mounts (installer-supplied; single-hole preferred).
- You keep your preferred attachment hardware — SlatePlate is the interface to the slate.
Roof types
- Natural slate.
- Designed to work with synthetic / composite slate and stone roofs — confirm your specific roof with us.
Racking
- Anchors a single-hole L-mount, so your installer’s rail lands on the L-mount as it would on any roof.
- SlatePlate is non-conductive and sits outside the module and rail bonding path; bonding is handled by the racking, as on any roof.
- Railless systems have not yet been tested or requested.
Frequently Asked Questions (FAQ)
Solar on a slate roof, answered.
Can you really put solar on a slate roof?
Yes. Slate is brittle and standard mounting risks cracking it, which is why many installers decline slate-roof jobs. SlatePlate is a patented mounting system that lets solar panels be installed on slate roofs — designed to transfer the array’s load into the roof structure, not the brittle slate.
Will it crack or damage the slate?
The method is built to avoid it. The notch is scored between two relief holes so the slate breaks cleanly rather than fracturing, and the finished mount seats against the slate instead of clamping or loading it. The slate is not part of what holds the panels up.
Does the roof stay waterproof?
Yes — and it was tested that way. SlatePlate passed the 110 MPH wind-driven-rain TAS 100(A) test, certified by Intertek, with no sealant and zero leaks. On the roof we always seal it twice anyway: once in the bored cavity beneath the SlatePlate flashing, and again above it where the lag passes through, set with a butyl/stainless washer. The SlatePlate sheet flashes the penetration and the slate above laps back over it, so the roof keeps shedding water the way a slate roof is meant to.
Who installs it?
A solar installer trained on the SlatePlate method, or the Solar Slate Solutions crew for the slate mounting — people set up to work on slate. Your solar installer sets the panels, wiring, and permitting. Layout and mounting follow the project engineering and local & state ICC codes.
What racking does it work with?
SlatePlate anchors a standard L-Mount (single-hole preferred), so the installer’s own rail lands on the L-mount as it would on any roof. We do not publish a compatible-racking list.
For installers, roofers & EPCs
The questions the trade asks.
Who carries liability if a slate cracks or the roof leaks?
Responsibility follows the installation contract and the SlatePlate product warranty. The method is designed to seat against the slate rather than clamp or load it, and each penetration is sealed and flashed. Confirm coverage on the warranty page.
What is the callback / leak track record?
Each mount is sealed in the cavity, set with a butyl/stainless washer, sealed again above the flashing where the lag passes through, and the design keeps the load off the slate. To date we have no callbacks and no leaks.
How long does each mount take, and how do I bid the labor?
The method is the six-step sequence above, repeated at each attachment point — approximately 4 minutes per mount for a trained, experienced installer. Bid from that, and from your own crew’s first trial on the method.
How does an installer get trained or become a dealer?
Installers can be trained on the SlatePlate method, and there is an installer and dealer path. Contact us to discuss training and distribution for your territory.
Documentation
Specs and the install guide.
Engineering documentation available on request for your project — tell us your roof, array size, and racking, and we’ll send the technical documentation your team needs.
Full specifications, the bill of materials and the installation booklet are published on the Technical Documents page, each with a document version.
Warranty
SlatePlate is backed by a limited product warranty from Solar Slate Solutions covering the mounting system. See the warranty page for the current terms and how to register a claim.
Request the spec packet.
Patented, U.S.-made slate-roof mounting — sold in kits of 20.
Tell us about the project — roof, array size, and racking — and we’ll send pricing, distributor information, and the technical documentation your team needs.
Mon–Fri 9–5 · Sat 9–1 · Sun closed
Keep exploring
Related pages
For homeowners
What a slate roof needs before solar goes on it, who does the work, and what to expect from first call to finished array. For homeowners →
For slate roofers
How the slate is handled, where your trade fits in the job, and the partner path. For slate roofers →
Solar installers
How we train and supply installers on the method so your crew can take on slate with confidence. For solar installers →